Alternative name: “The COLUMN of death”
Eternal War
Scans have picked up an outcrop of bright glowing crystals that give off energy readings similar to parts of the signal that drew you into Tuhinga. If you collect samples, you may be able to find out more.
The Armies
Each player selects a Battle-forged army to an agreed points limit. One player will then be designated the attacker, the other defender.
The Battlefield
Create the battlefield and set up terrain. Players take it in turns to place six objective markers within the defender’s deployment zone. Each marker must be WITHIN three inches of another.
Deployment
Players deploy according to the specific deployment map below:
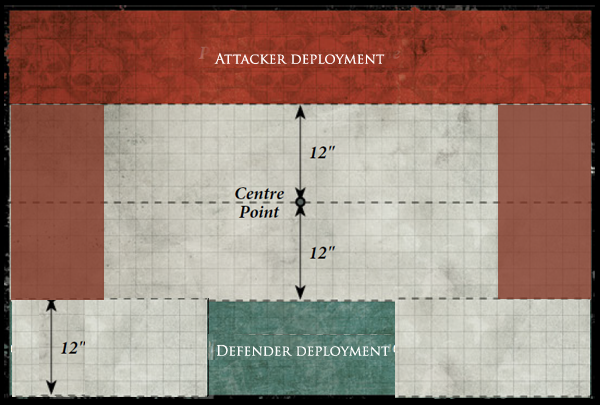
The defenders deploy their entire army first, then attackers deploy their army.
First Turn
The first turn is determined by a roll off wherein the attackers get a +1 to the roll. Whoever does not get the first turn may attempt to seize the initiative on the roll of a 6.
Acceptable Casualties
The matched play rules for Sudden Death are not used in this mission.
Endless Feast
At the beginning of battle round 2, the attacker rolls a D6 to randomly determine a short board edge. Mark out 12” from that board edge towards the centre. This designates where Biss’ resident Tyranid horde has got to. Any model caught in this automatically takes a single mortal wound at the beginning of the battle round.
On each further turn, move the 12” line across the board by another 12”.
If a model with multiple wounds gets caught in this zone, after taking a mortal wound they may move and shoot normally if they pass a leadership test.
Battle Length
At the end of battle round 5, the player who had the first turn rolls a D6. On a 4+ the game continues, otherwise the game is over. At the end of battle round 6, the game will automatically end.
Victory Conditions
At the end of the game, the player with the most victory points is the winner. Victory points are awarded for the following:
Crystal Harvest: Score one point for each crystal harvested at the end of the game. Crystals can be harvested using the special stratagem below.
Slay the Warlord
First Strike
Linebreaker
Mission stratagems:
Crystal Harvest: 1CP
Instead of shooting, one unit that is within 3” of an objective marker may spend its shooting phase collecting a crystal sample, worth 1 victory point.
Hasty withdrawal: 1CP
A unit within 6” of the Tyranid horde line may move and advance with a guaranteed advance of 6”.
Tyranid diversion (defender stratagem): 1CP
Force the attacker to re-roll to determine which board edge the tyranids appear from.
Prepared firing solution (attacker stratagem): 1CP
At any point during one of the attacker’s turns, they may launch an artillery barrage, causing each unit to take 1 mortal wound on the roll of a six. (operates the same way as a preliminary bombardment in the Astra Militarum Codex for reference.
Designers note: The defenders should have a bit of an advantage on this one, hopefully mitigated by the fact that the attackers have more deployment options and deploy second. I have NO IDEA if this will work or if it will be a colossal mess!